In the following tutorial i Will try to outline how to create a stretchy chain of Bones.

The new feature.
In Blender 2.40 a new característica was introduced, the ability to set a Bones stretch limit. From 0.00 to 1.00. Even though it doesnt matter what number you enter to stretch the Bones, since they Will stretch endlessly. The number Matters when you want certian Bones to be stretch more then others in a chain of Bones.
Note: this input field pops up only if the bone is part of an IK chain.

Sidenote: learn about other features introduced.
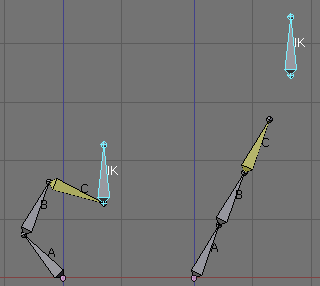
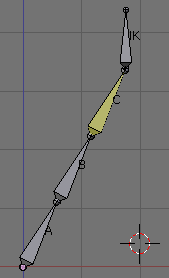
Here is a chain of Bones.

Just incase you want to follow along: [URL=http://www.foro3d.com/attachment.php?attachmentid=82484&stc=1&d=12228159 001.blend[/url].
When the IK bone is moved around the other Bones follow.
But when the IK bone is pulled to far, the Bones point toward the direction but dont do much.

Now lets set the stretch input to 0.3 for bone a.

Since a was the only bone given a stretch property it Will be the only bone that stretches.
At this point we want all the Bones to stretch the same so give abc all a 0.3 stretch input.
(but you can go ahead and play around, giving them diferent numbers.).

Create simple cylinder with 3 sections (since we have 3 Bones)

Create 3 vertex groups, (a, b and c) and assing corresponding vértices.

– select the Mesh, followed by selecting the armature and click Control + p (shortcut for parenting).
– select armature.
– dont name groups (we already made the groups).
– click on the armature.
– disable the envelopes button in the armature menú.
Now try moving the IK bone around.

The blend file: [URL=http://www.foro3d.com/attachment.php?attachmentid=82485&stc=1&d=12228159 002.blend[/url].
There is a problem.
The Bones not only stretch the Mesh but a los scale it. The more the Bones stretch the fatter the Mesh becomes.
This is a problem, but there is a trik around it.
– click on the armature, and go into edit mode.
– select Bones a, b and c and duplicate them.
Important hold down Control when moving the duplicates, so we can later Snap them ontop of the original Bones.

– click on each duplicate bone (b.001 and c.001) and remove it parent.

Go into pose mode, click on bone a.001 and add the following constraints to it.

Explaination.
This is a bone.

When we added the copy location constraint, that made the ends of bone a, and a.001 match up.
When we added the stretch to constraint that made the tip of a.001 stretch to the end of b.
We a los added a copy rotation constraint, which Will later copy the rotations of the a bone.

Now click on b.001, have it copy the location and rotation of b, and stretch to c.
– click on c.001, have it copy the location and rotation of c, and stretch to the IK bone.

– click on the armature, and go into edit mode.
– select the duplicate Bones and Snap (hold Control) over the original Bones.

Now we want the Mesh to use the duplicate Bones, so change the names of the vertex groups (a to a.001, b to b.001 and c to c.001)

Now judge the results.

The blend file: [URL=http://www.foro3d.com/attachment.php?attachmentid=82486&stc=1&d=12228159 003.blend[/url].
Note.
– you can go ahead and hide (or if using 2.42 place in a diferent layer) the original Bones.
Extra.
Bak in the day when i was breaquíng ludwig apart for learning, y attempted to recreate the spine. Which you should now be able to do with the knowledge you gained reading the tutorial above. Anyways, enjoy.

The blend file: [URL=http://www.foro3d.com/attachment.php?attachmentid=82487&stc=1&d=12228159 0ludspine, blend[/url].
Stretchy Bones.
a tutorial by Calvin.
